1.4 Hello Spring Boot
程序员都有“Hello world.”情结,我们在了解了Spring和Spring Boot的历史和特性之后,也以Spring Boot的“Hello world.”来感受我们后续将要学习的Spring Boot应用程序是如何开发的。
本小节的目的是为了给大家一个开发Spring Boot应用程序的初步印象,暂时没有开发环境,无法练习也没有关系,学习完第2章后返回来学习效果更好。
请参照本教程第2章的“开发环境配置”,完成本地开发环境的配置,然后再来“Hello Spring Boot.”。
1.4.1 创建项目
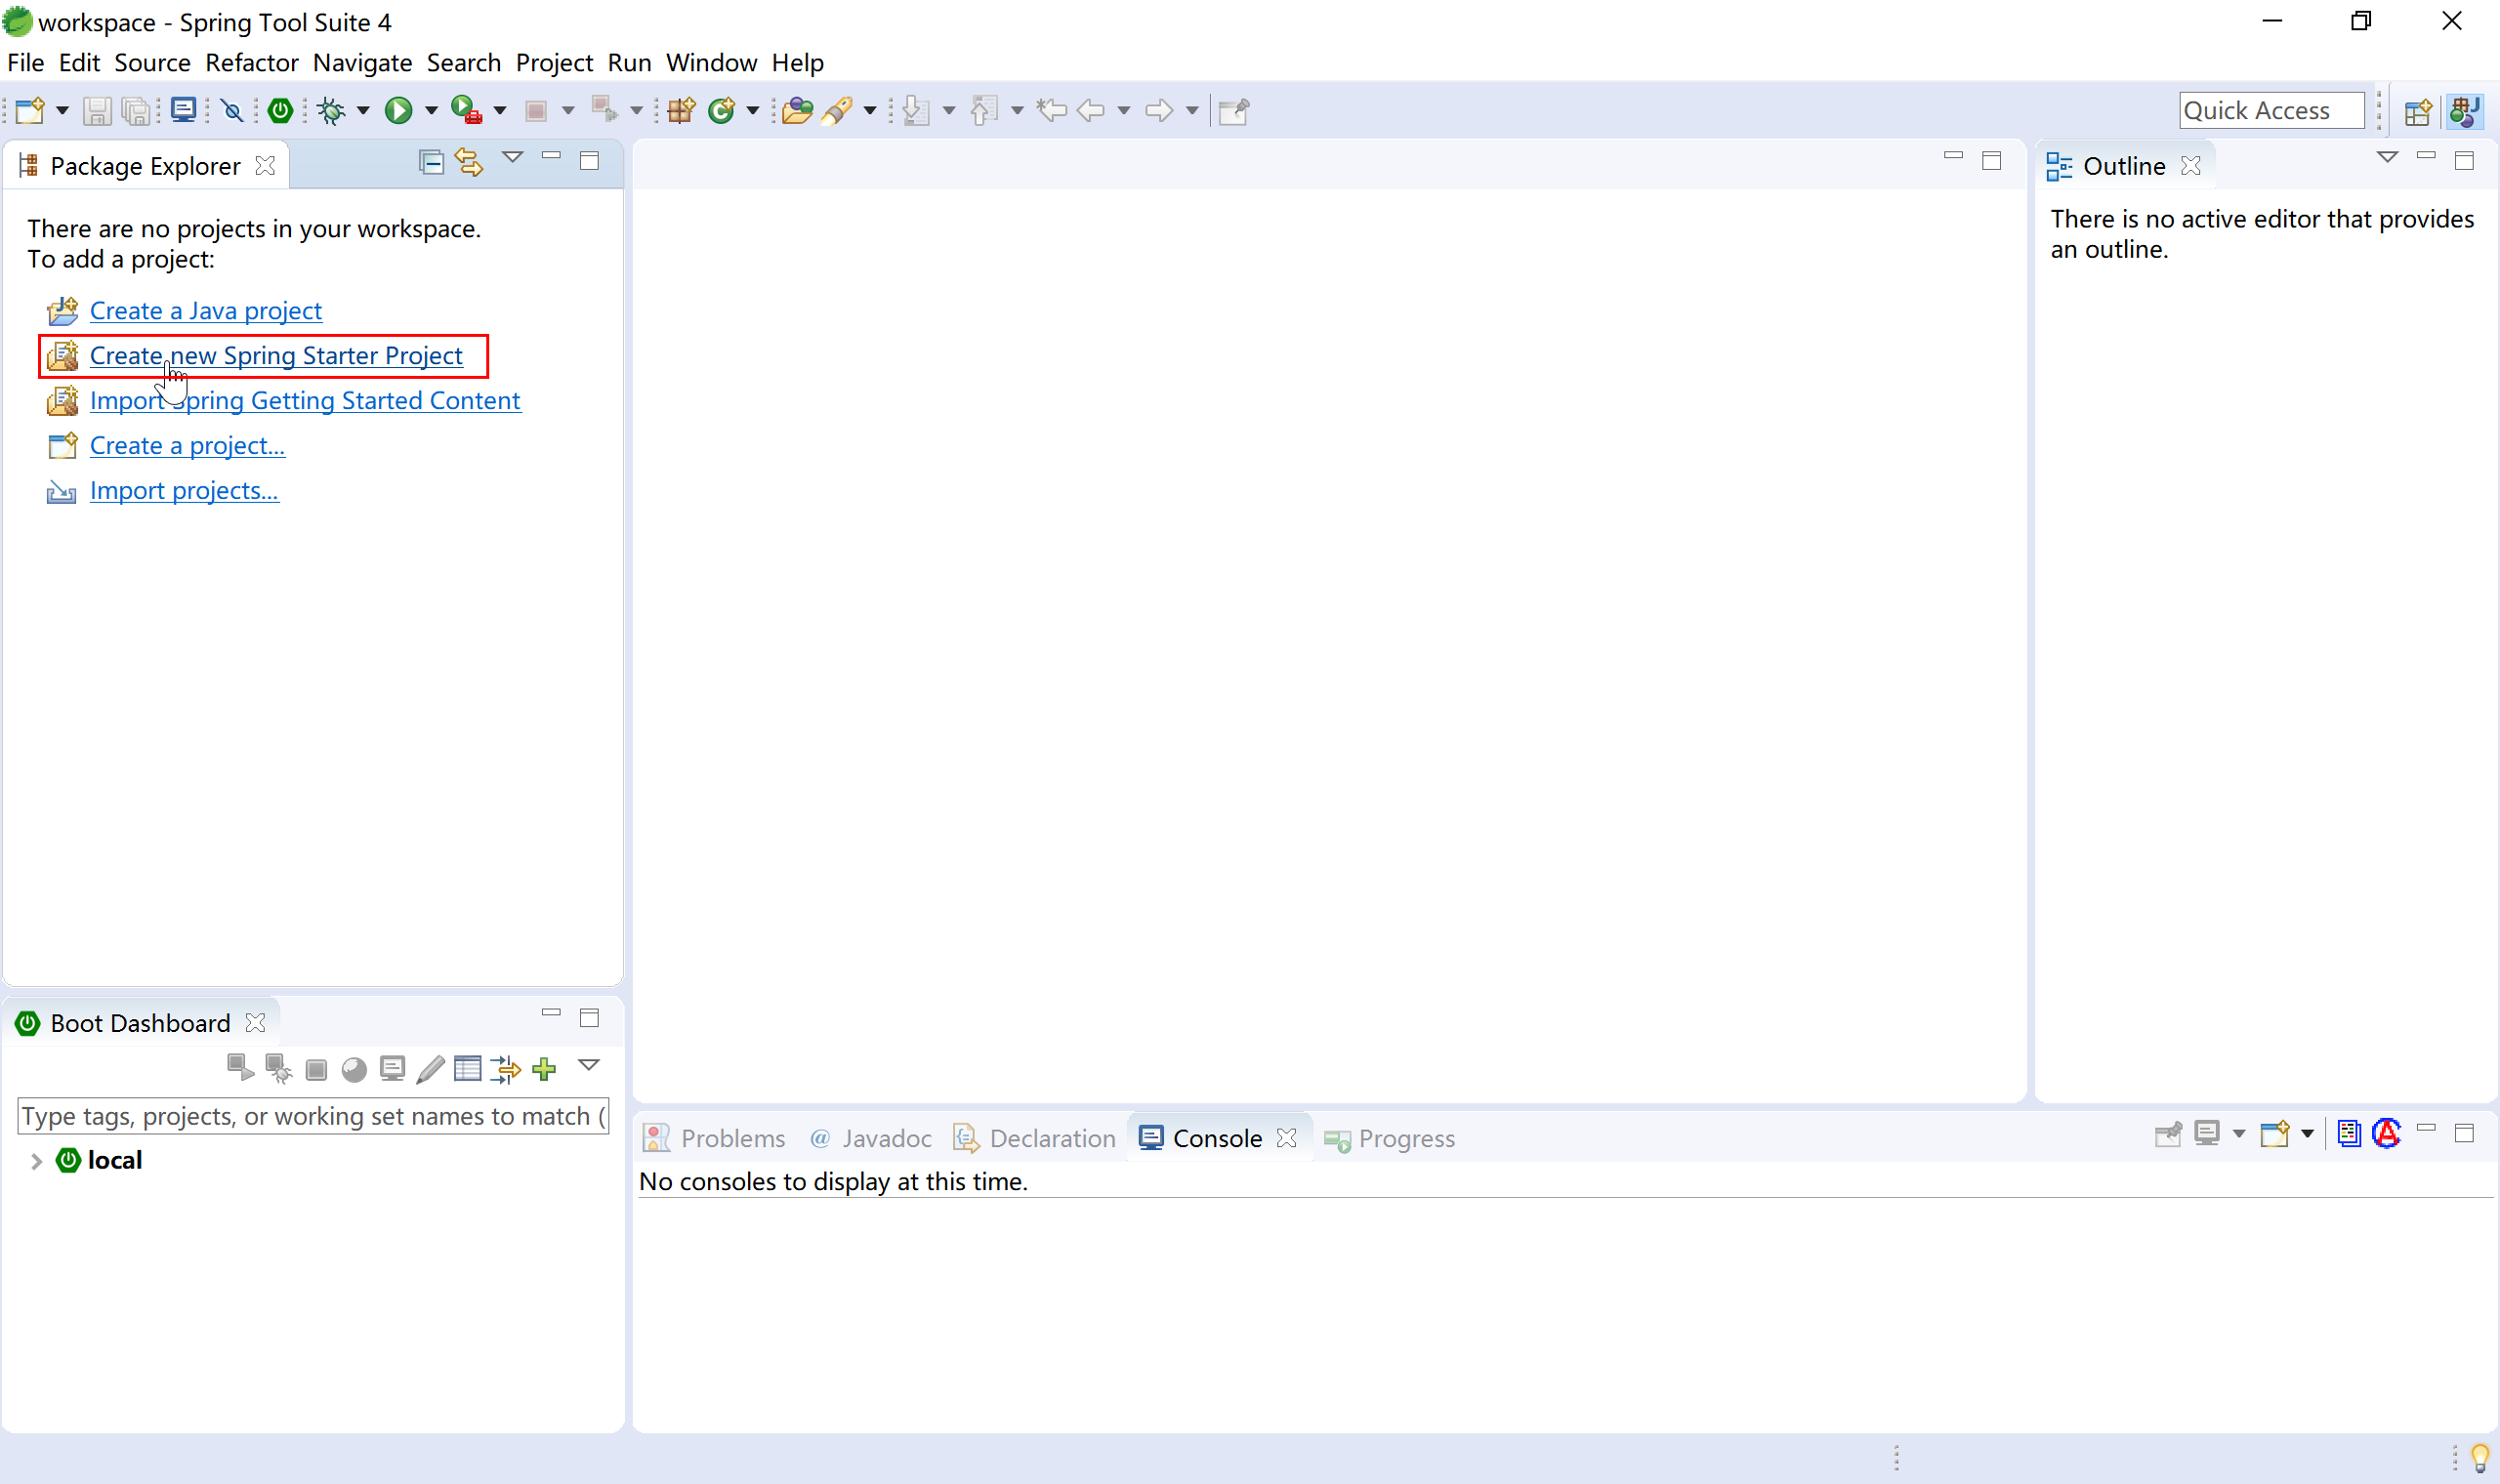
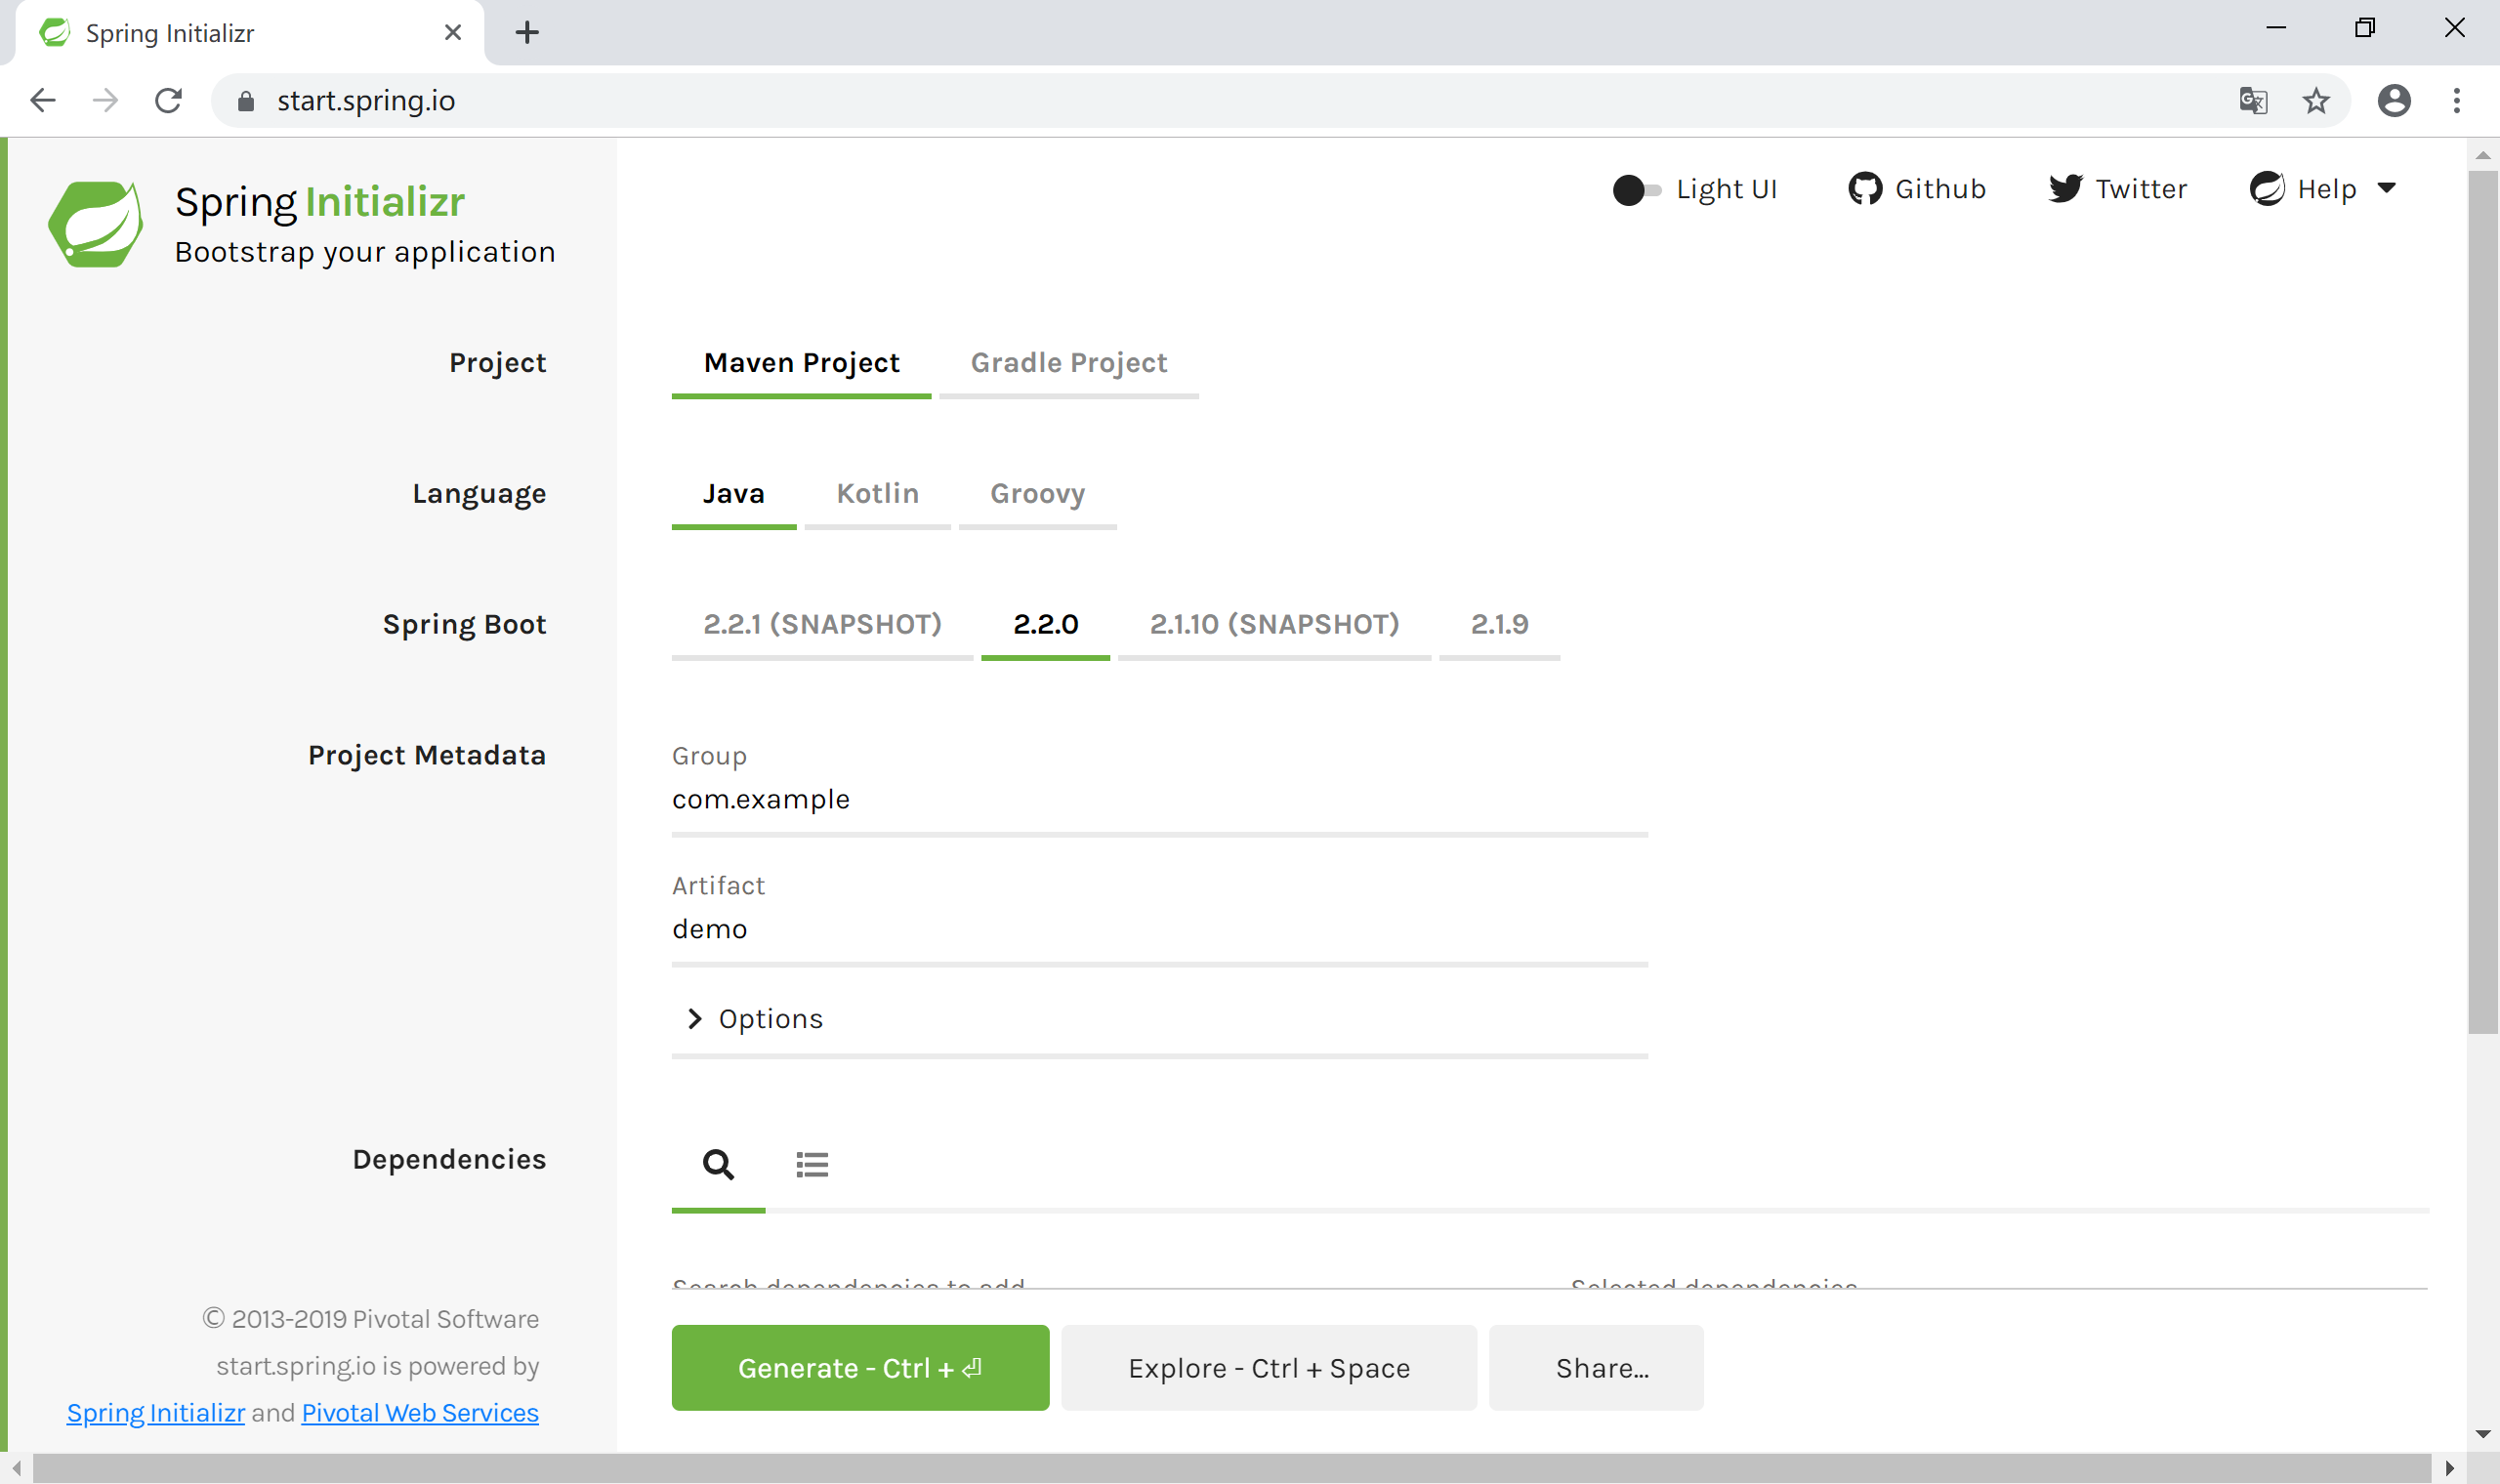
首先,我们创建一个Spring Starter工程,如下图所示:
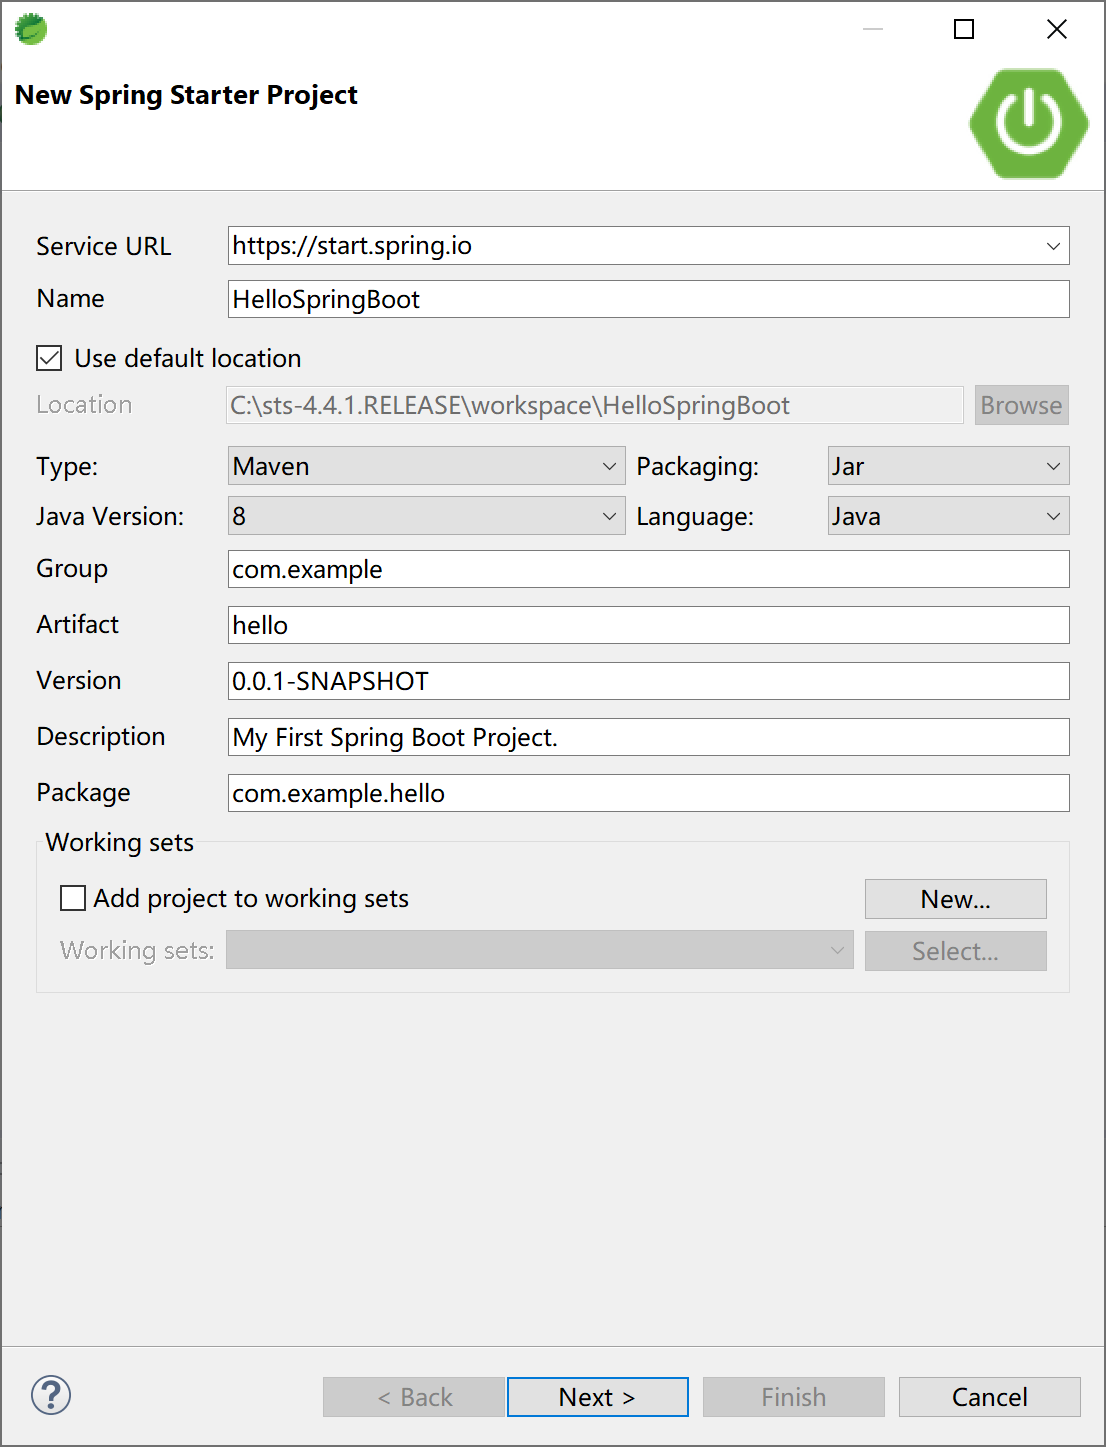
输入项目名称、项目的GAV(maven依赖的坐标:Group、Artifact、Version)、Package等信息:
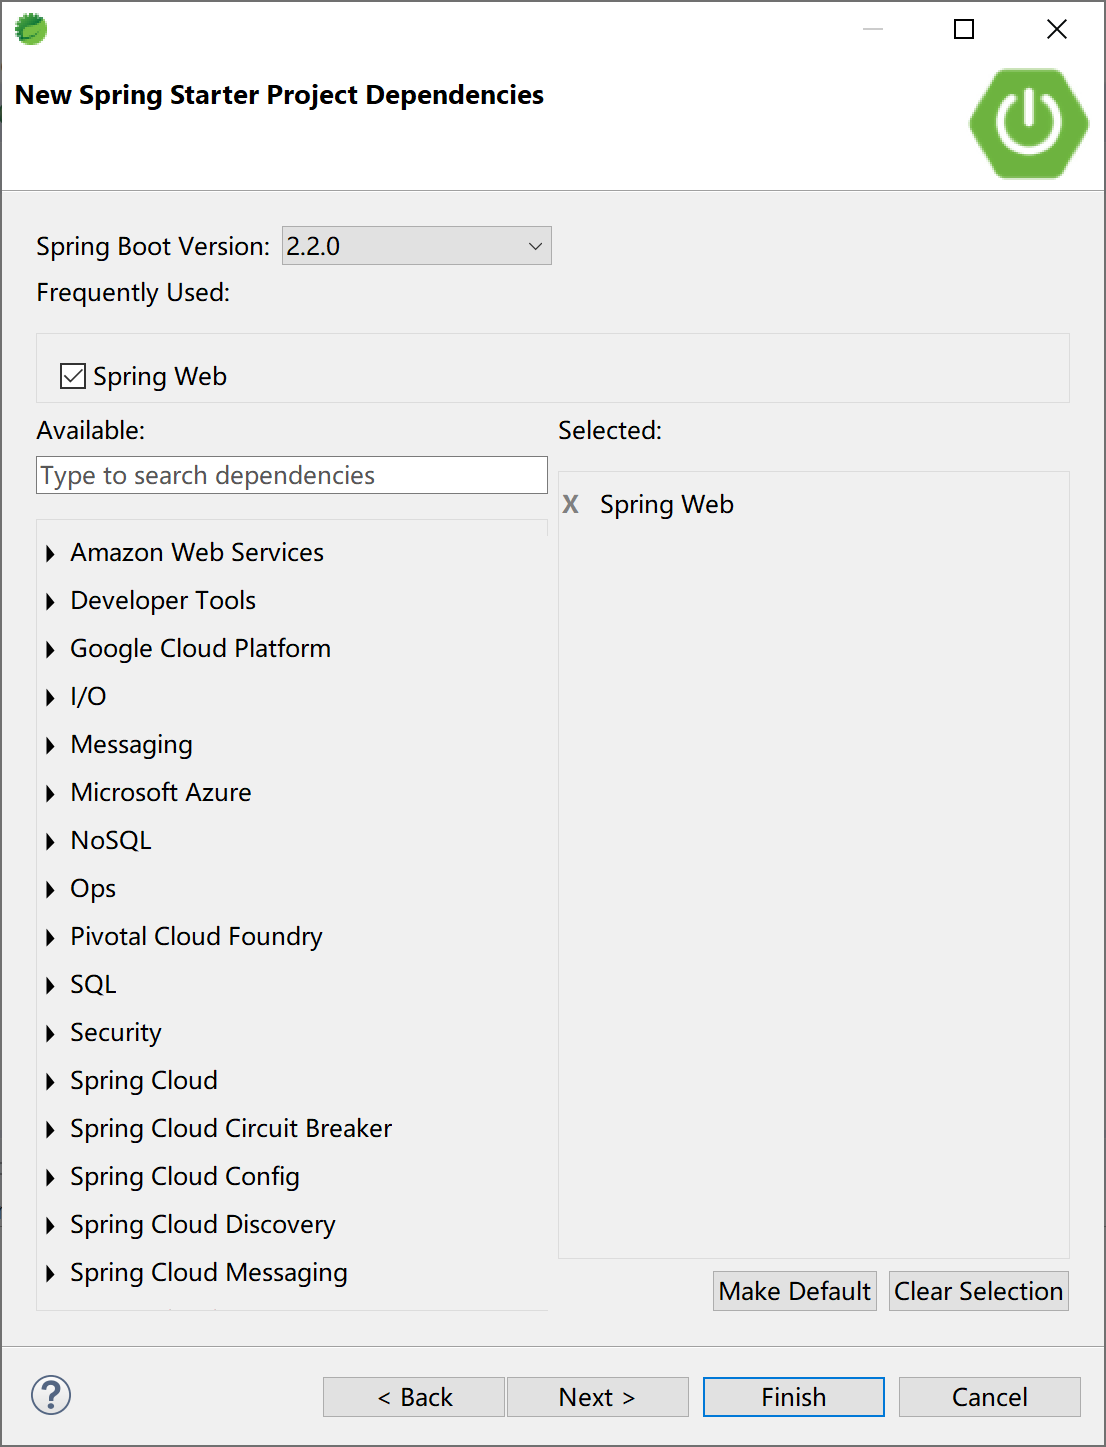
选择Spring Boot的版本,当前最新为2.2.0(截至2019年11月):
其实,STS开发工具,是通过Eclipse插件连接到网络,根据我们之前给定的参数设定请求参数,然后在Spring官网生成项目骨架(starter.zip),这和在 start.spring.io 上生成项目骨架是完全一致的。
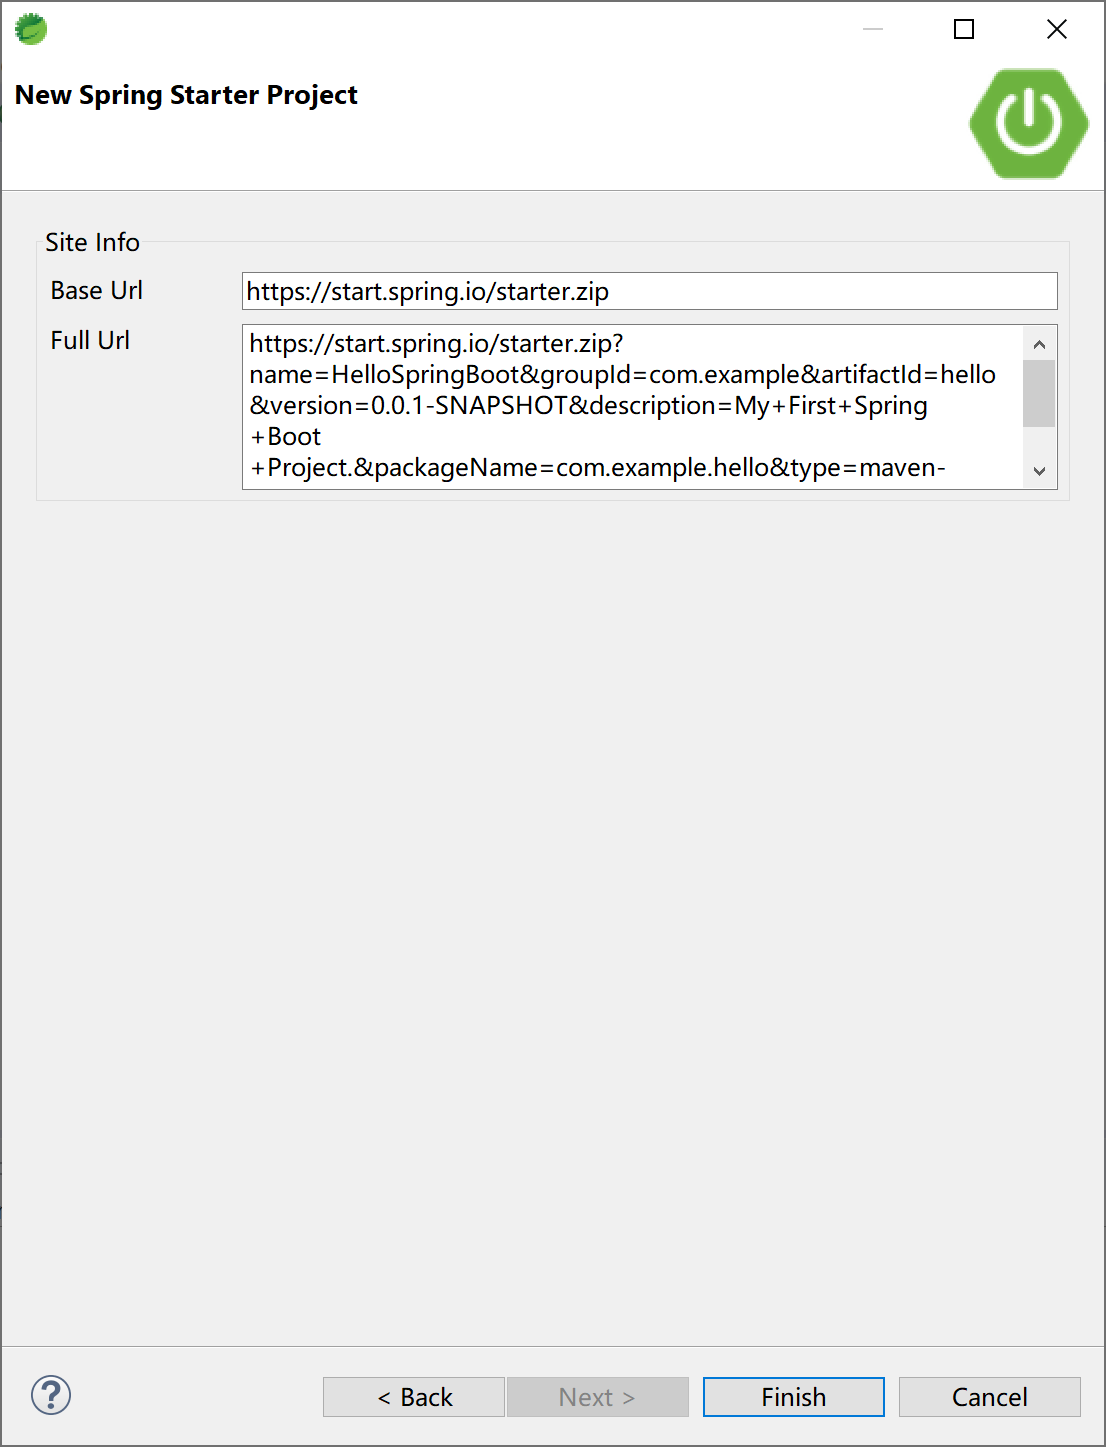
参考 start.spring.io 生成项目骨架,后台服务一定是相同的。
稍等片刻(如果网络不给力,有可能要等上好一阵子呢),maven会下载所有的依赖。
Spring官网为我们生成的pom.xml文件如下:
<?xml version="1.0" encoding="UTF-8"?>
<project xmlns="http://maven.apache.org/POM/4.0.0" xmlns:xsi="http://www.w3.org/2001/XMLSchema-instance"
    xsi:schemaLocation="http://maven.apache.org/POM/4.0.0 https://maven.apache.org/xsd/maven-4.0.0.xsd">
    <modelVersion>4.0.0</modelVersion>
    <parent>
        <groupId>org.springframework.boot</groupId>
        <artifactId>spring-boot-starter-parent</artifactId>
        <version>2.2.0.RELEASE</version>
        <relativePath/> <!-- lookup parent from repository -->
    </parent>
    <groupId>com.example</groupId>
    <artifactId>hello</artifactId>
    <version>0.0.1-SNAPSHOT</version>
    <name>HelloSpringBoot</name>
    <description>My First Spring Boot Project.</description>

    <properties>
        <java.version>1.8</java.version>
    </properties>

    <dependencies>
        <dependency>
            <groupId>org.springframework.boot</groupId>
            <artifactId>spring-boot-starter-web</artifactId>
        </dependency>

        <dependency>
            <groupId>org.springframework.boot</groupId>
            <artifactId>spring-boot-starter-test</artifactId>
            <scope>test</scope>
            <exclusions>
                <exclusion>
                    <groupId>org.junit.vintage</groupId>
                    <artifactId>junit-vintage-engine</artifactId>
                </exclusion>
            </exclusions>
        </dependency>
    </dependencies>

    <build>
        <plugins>
            <plugin>
                <groupId>org.springframework.boot</groupId>
                <artifactId>spring-boot-maven-plugin</artifactId>
            </plugin>
        </plugins>
    </build>

</project>
需要注意的有几点:
- 第6-9行的spring-boot-starter-parent;
- 第22-25行的spring-boot-starter-web;
- 第42-45行的spring-boot-maven-plugin;
这些依赖,为我们大大简化了Spring应用程序的配置。当然,其中也隐藏了大量的魔法,在第3章中我们会简要的介绍这些魔法是怎么实现的,在这里,大家不要过度关注,不理解也不影响我们Say Hello to Spring Boot.
我们再来关注启动入口类HelloSpringBootApplication,这将是我们进入Spring Boot世界的第一道门。
package com.example.hello;

import org.springframework.boot.SpringApplication;
import org.springframework.boot.autoconfigure.SpringBootApplication;

@SpringBootApplication
public class HelloSpringBootApplication {

    public static void main(String[] args) {
        SpringApplication.run(HelloSpringBootApplication.class, args);
    }

}
这里唯一陌生的,也是最需要关注的,当然就是@SpringBootApplication这个注解。它标识了这个类是个Spring Boot的应用程序。
这个类中有main方法,运行它看看效果:
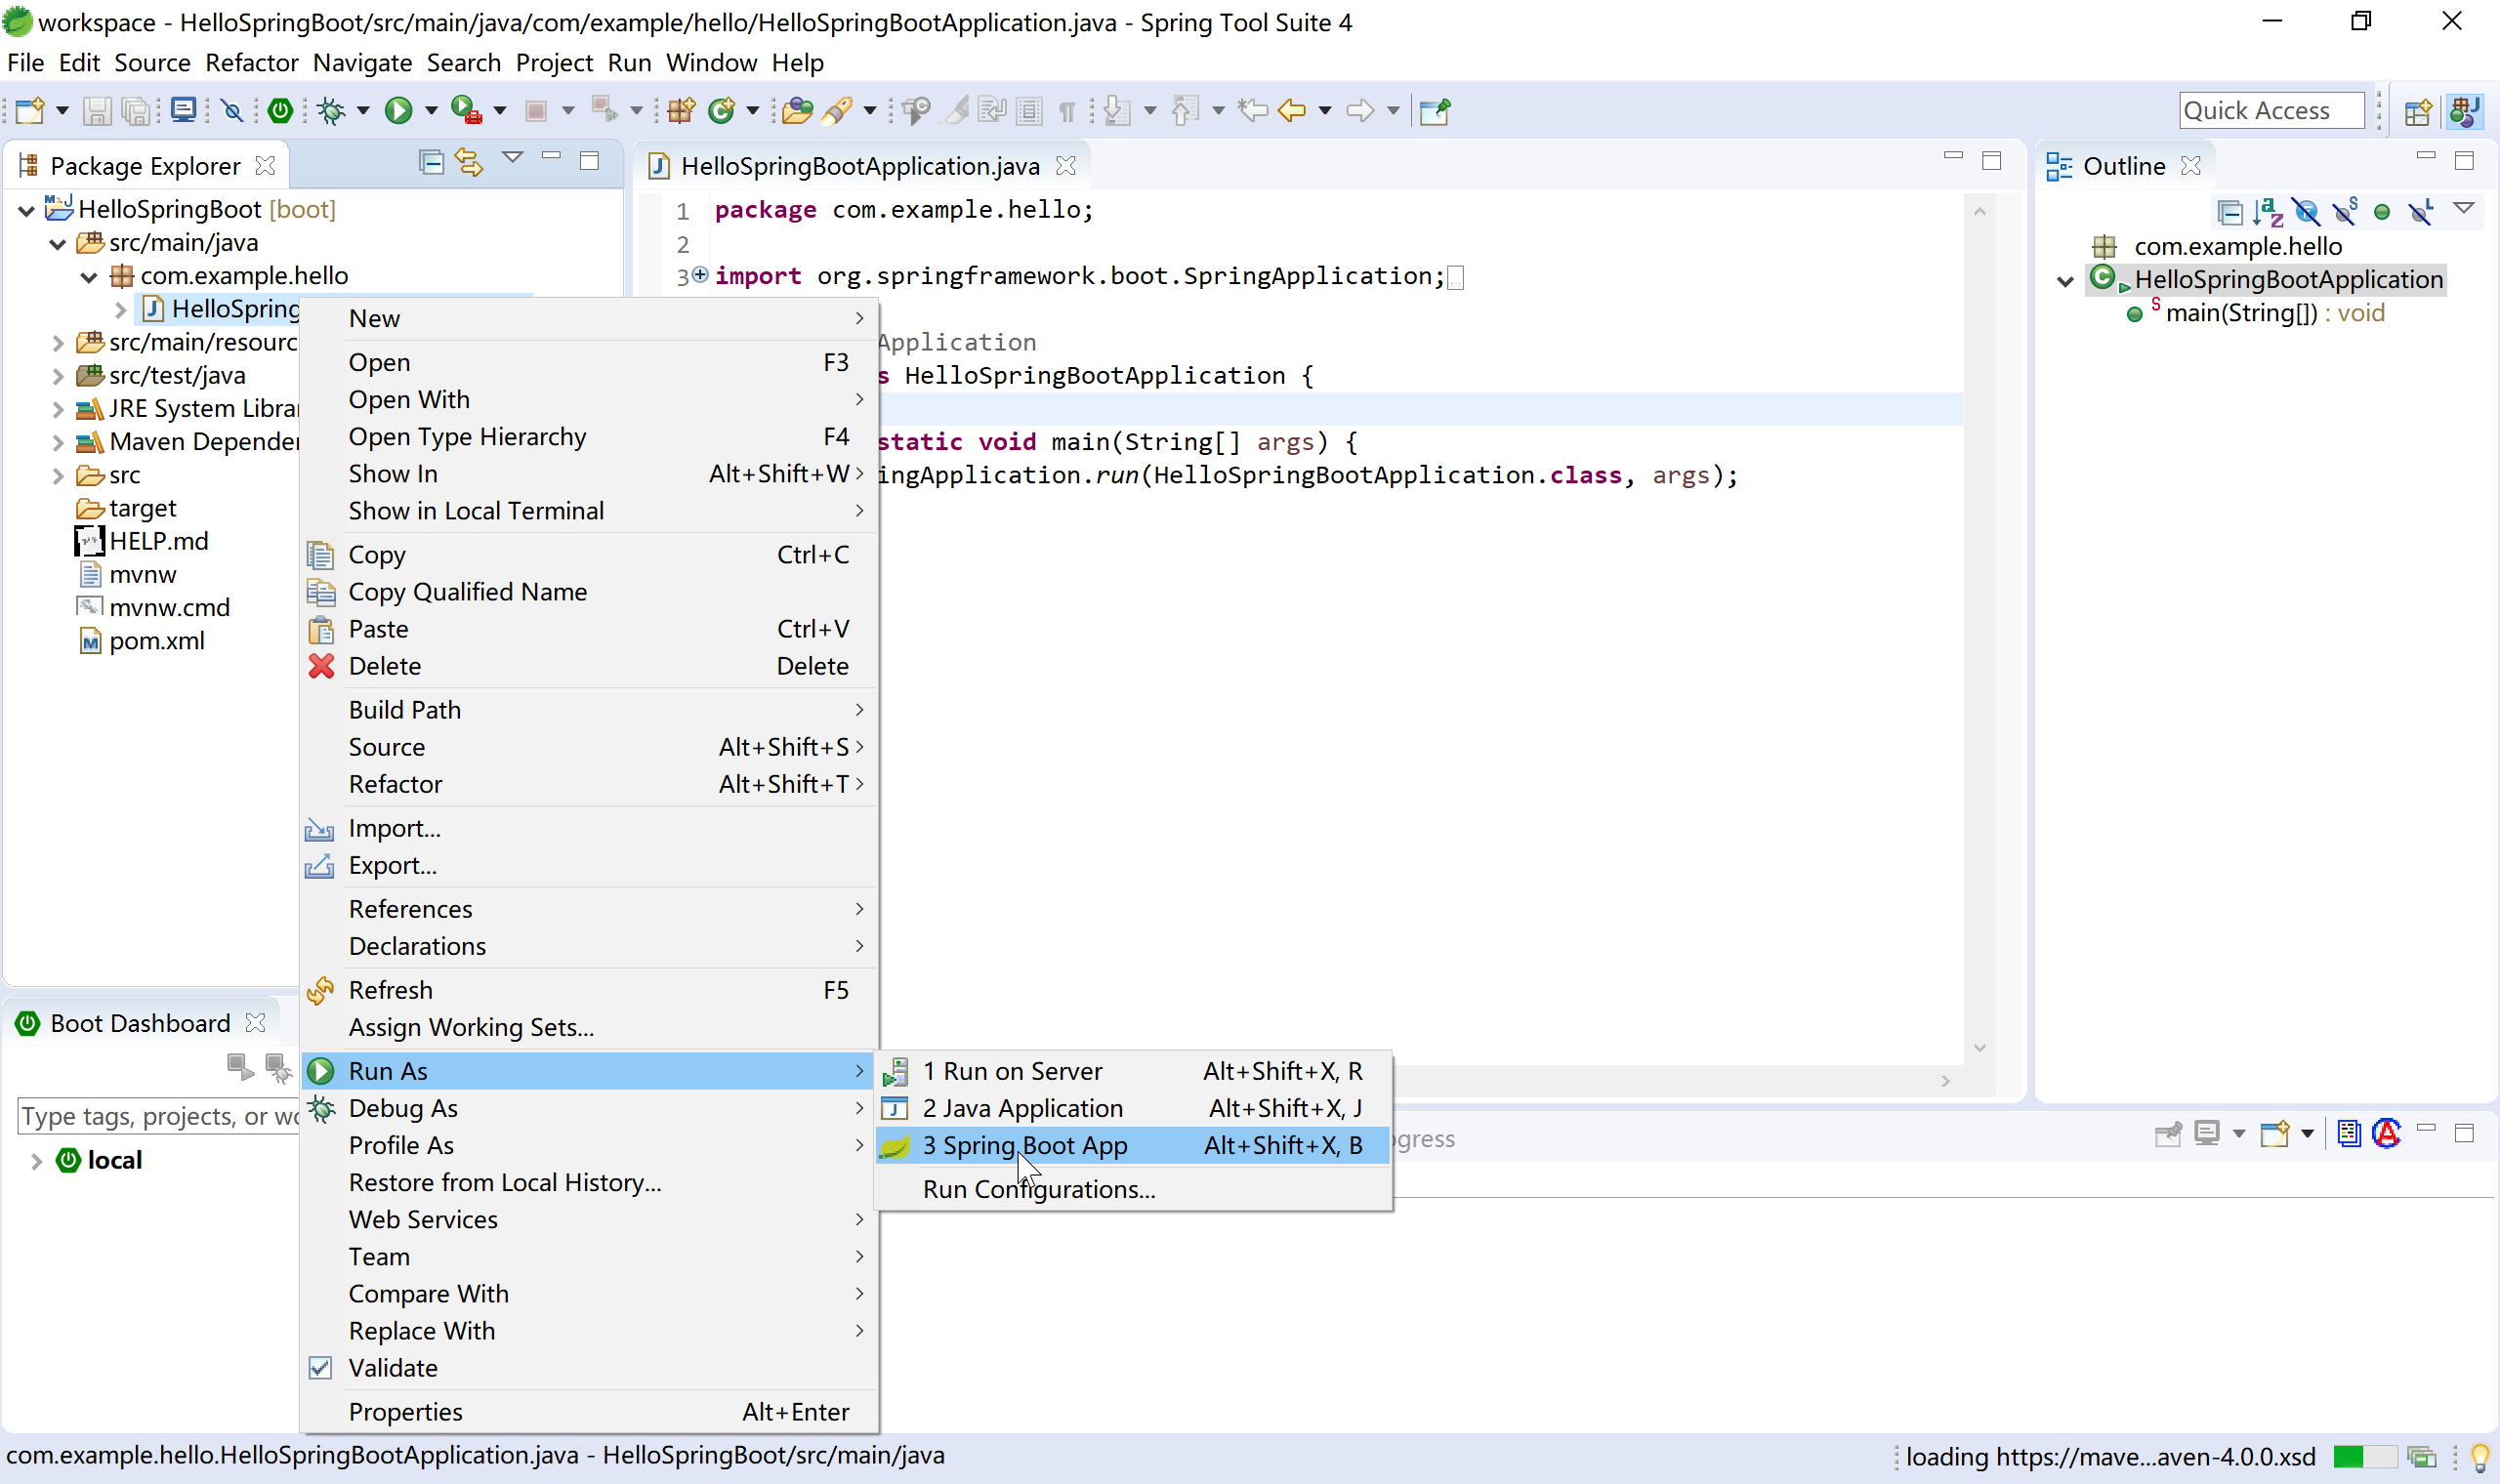
虽然没有啥效果,但控制台打出的日志,表明,这个Spring Boot程序确实可以正确运行。
  .   ____          _            __ _ _
 /\\ / ___'_ __ _ _(_)_ __  __ _ \ \ \ \
( ( )\___ | '_ | '_| | '_ \/ _` | \ \ \ \
 \\/  ___)| |_)| | | | | || (_| |  ) ) ) )
  '  |____| .__|_| |_|_| |_\__, | / / / /
 =========|_|==============|___/=/_/_/_/
 :: Spring Boot ::        (v2.2.0.RELEASE)

2019-11-06 22:27:52.949  INFO 1704 --- [           main] c.e.hello.HelloSpringBootApplication     : Starting HelloSpringBootApplication on NOTEBOOK-KEVIN with PID 1704 (C:\sts-4.4.1.RELEASE\workspace\HelloSpringBoot\target\classes started by Kevin in C:\sts-4.4.1.RELEASE\workspace\HelloSpringBoot)
2019-11-06 22:27:52.952  INFO 1704 --- [           main] c.e.hello.HelloSpringBootApplication     : No active profile set, falling back to default profiles: default
2019-11-06 22:27:53.663  INFO 1704 --- [           main] o.s.b.w.embedded.tomcat.TomcatWebServer  : Tomcat initialized with port(s): 8080 (http)
2019-11-06 22:27:53.671  INFO 1704 --- [           main] o.apache.catalina.core.StandardService   : Starting service [Tomcat]
2019-11-06 22:27:53.672  INFO 1704 --- [           main] org.apache.catalina.core.StandardEngine  : Starting Servlet engine: [Apache Tomcat/9.0.27]
2019-11-06 22:27:53.727  INFO 1704 --- [           main] o.a.c.c.C.[Tomcat].[localhost].[/]       : Initializing Spring embedded WebApplicationContext
2019-11-06 22:27:53.728  INFO 1704 --- [           main] o.s.web.context.ContextLoader            : Root WebApplicationContext: initialization completed in 736 ms
2019-11-06 22:27:53.861  INFO 1704 --- [           main] o.s.s.concurrent.ThreadPoolTaskExecutor  : Initializing ExecutorService 'applicationTaskExecutor'
2019-11-06 22:27:54.019  INFO 1704 --- [           main] o.s.b.w.embedded.tomcat.TomcatWebServer  : Tomcat started on port(s): 8080 (http) with context path ''
2019-11-06 22:27:54.021  INFO 1704 --- [           main] c.e.hello.HelloSpringBootApplication     : Started HelloSpringBootApplication in 1.422 seconds (JVM running for 2.316)
1.4.2 编写Controller代码
下面,我们为这个程序添加一个Controller,输出“Hello Spring Boot.”这句话。
首先创建com.example.hello.controller包,然后在其下创建SayHelloController类,代码如下:
package com.example.hello.controller;

import org.springframework.web.bind.annotation.RequestMapping;
import org.springframework.web.bind.annotation.RestController;

@RestController
public class SayHelloController {

    @RequestMapping("/hello")
    public String sayHello() {
        return "Hello Spring Boot.";
    }

}
1.4.3 在IDE中运行
再次运行HelloSpringBootApplication这个类(当然,也可以说运行这个Spring Boot应用/程序),在控制台中输出的日志,已经包含DispatcherServlet这个Spring MVC的前端分发器类了。
  .   ____          _            __ _ _
 /\\ / ___'_ __ _ _(_)_ __  __ _ \ \ \ \
( ( )\___ | '_ | '_| | '_ \/ _` | \ \ \ \
 \\/  ___)| |_)| | | | | || (_| |  ) ) ) )
  '  |____| .__|_| |_|_| |_\__, | / / / /
 =========|_|==============|___/=/_/_/_/
 :: Spring Boot ::        (v2.2.0.RELEASE)

2019-11-06 22:33:48.882  INFO 7872 --- [           main] c.e.hello.HelloSpringBootApplication     : Starting HelloSpringBootApplication on NOTEBOOK-KEVIN with PID 7872 (C:\sts-4.4.1.RELEASE\workspace\HelloSpringBoot\target\classes started by Kevin in C:\sts-4.4.1.RELEASE\workspace\HelloSpringBoot)
2019-11-06 22:33:48.891  INFO 7872 --- [           main] c.e.hello.HelloSpringBootApplication     : No active profile set, falling back to default profiles: default
2019-11-06 22:33:49.558  INFO 7872 --- [           main] o.s.b.w.embedded.tomcat.TomcatWebServer  : Tomcat initialized with port(s): 8080 (http)
2019-11-06 22:33:49.564  INFO 7872 --- [           main] o.apache.catalina.core.StandardService   : Starting service [Tomcat]
2019-11-06 22:33:49.565  INFO 7872 --- [           main] org.apache.catalina.core.StandardEngine  : Starting Servlet engine: [Apache Tomcat/9.0.27]
2019-11-06 22:33:49.613  INFO 7872 --- [           main] o.a.c.c.C.[Tomcat].[localhost].[/]       : Initializing Spring embedded WebApplicationContext
2019-11-06 22:33:49.614  INFO 7872 --- [           main] o.s.web.context.ContextLoader            : Root WebApplicationContext: initialization completed in 688 ms
2019-11-06 22:33:49.731  INFO 7872 --- [           main] o.s.s.concurrent.ThreadPoolTaskExecutor  : Initializing ExecutorService 'applicationTaskExecutor'
2019-11-06 22:33:49.863  INFO 7872 --- [           main] o.s.b.w.embedded.tomcat.TomcatWebServer  : Tomcat started on port(s): 8080 (http) with context path ''
2019-11-06 22:33:49.865  INFO 7872 --- [           main] c.e.hello.HelloSpringBootApplication     : Started HelloSpringBootApplication in 1.262 seconds (JVM running for 1.873)
2019-11-06 22:33:59.678  INFO 7872 --- [nio-8080-exec-1] o.a.c.c.C.[Tomcat].[localhost].[/]       : Initializing Spring DispatcherServlet 'dispatcherServlet'
2019-11-06 22:33:59.678  INFO 7872 --- [nio-8080-exec-1] o.s.web.servlet.DispatcherServlet        : Initializing Servlet 'dispatcherServlet'
2019-11-06 22:33:59.686  INFO 7872 --- [nio-8080-exec-1] o.s.web.servlet.DispatcherServlet        : Completed initialization in 8 ms
打开浏览器,访问localhost:8080/hello,可以正确得到前面Controller类中sayHello方法的输出:
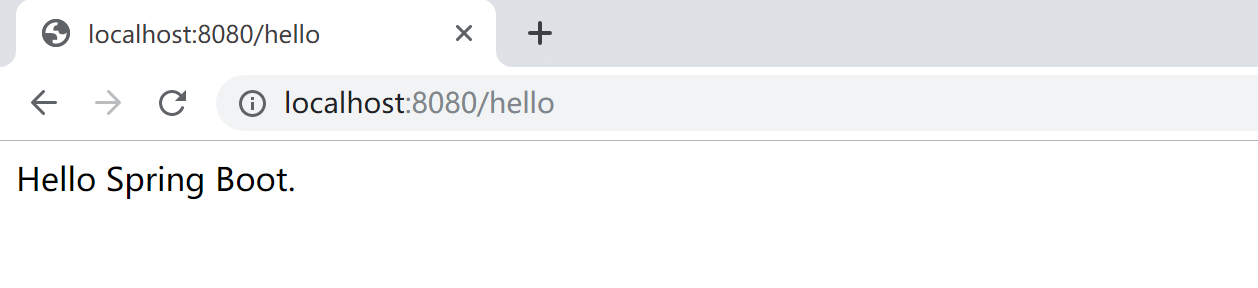
恭喜你,你已经完成了你的第一个Spring Boot程序。
1.4.4 打包
当一个应用开发完成后,需要分发时,通常会将Spring Boot应用程序打包为一个jar包。
在STS中,选择Maven build...
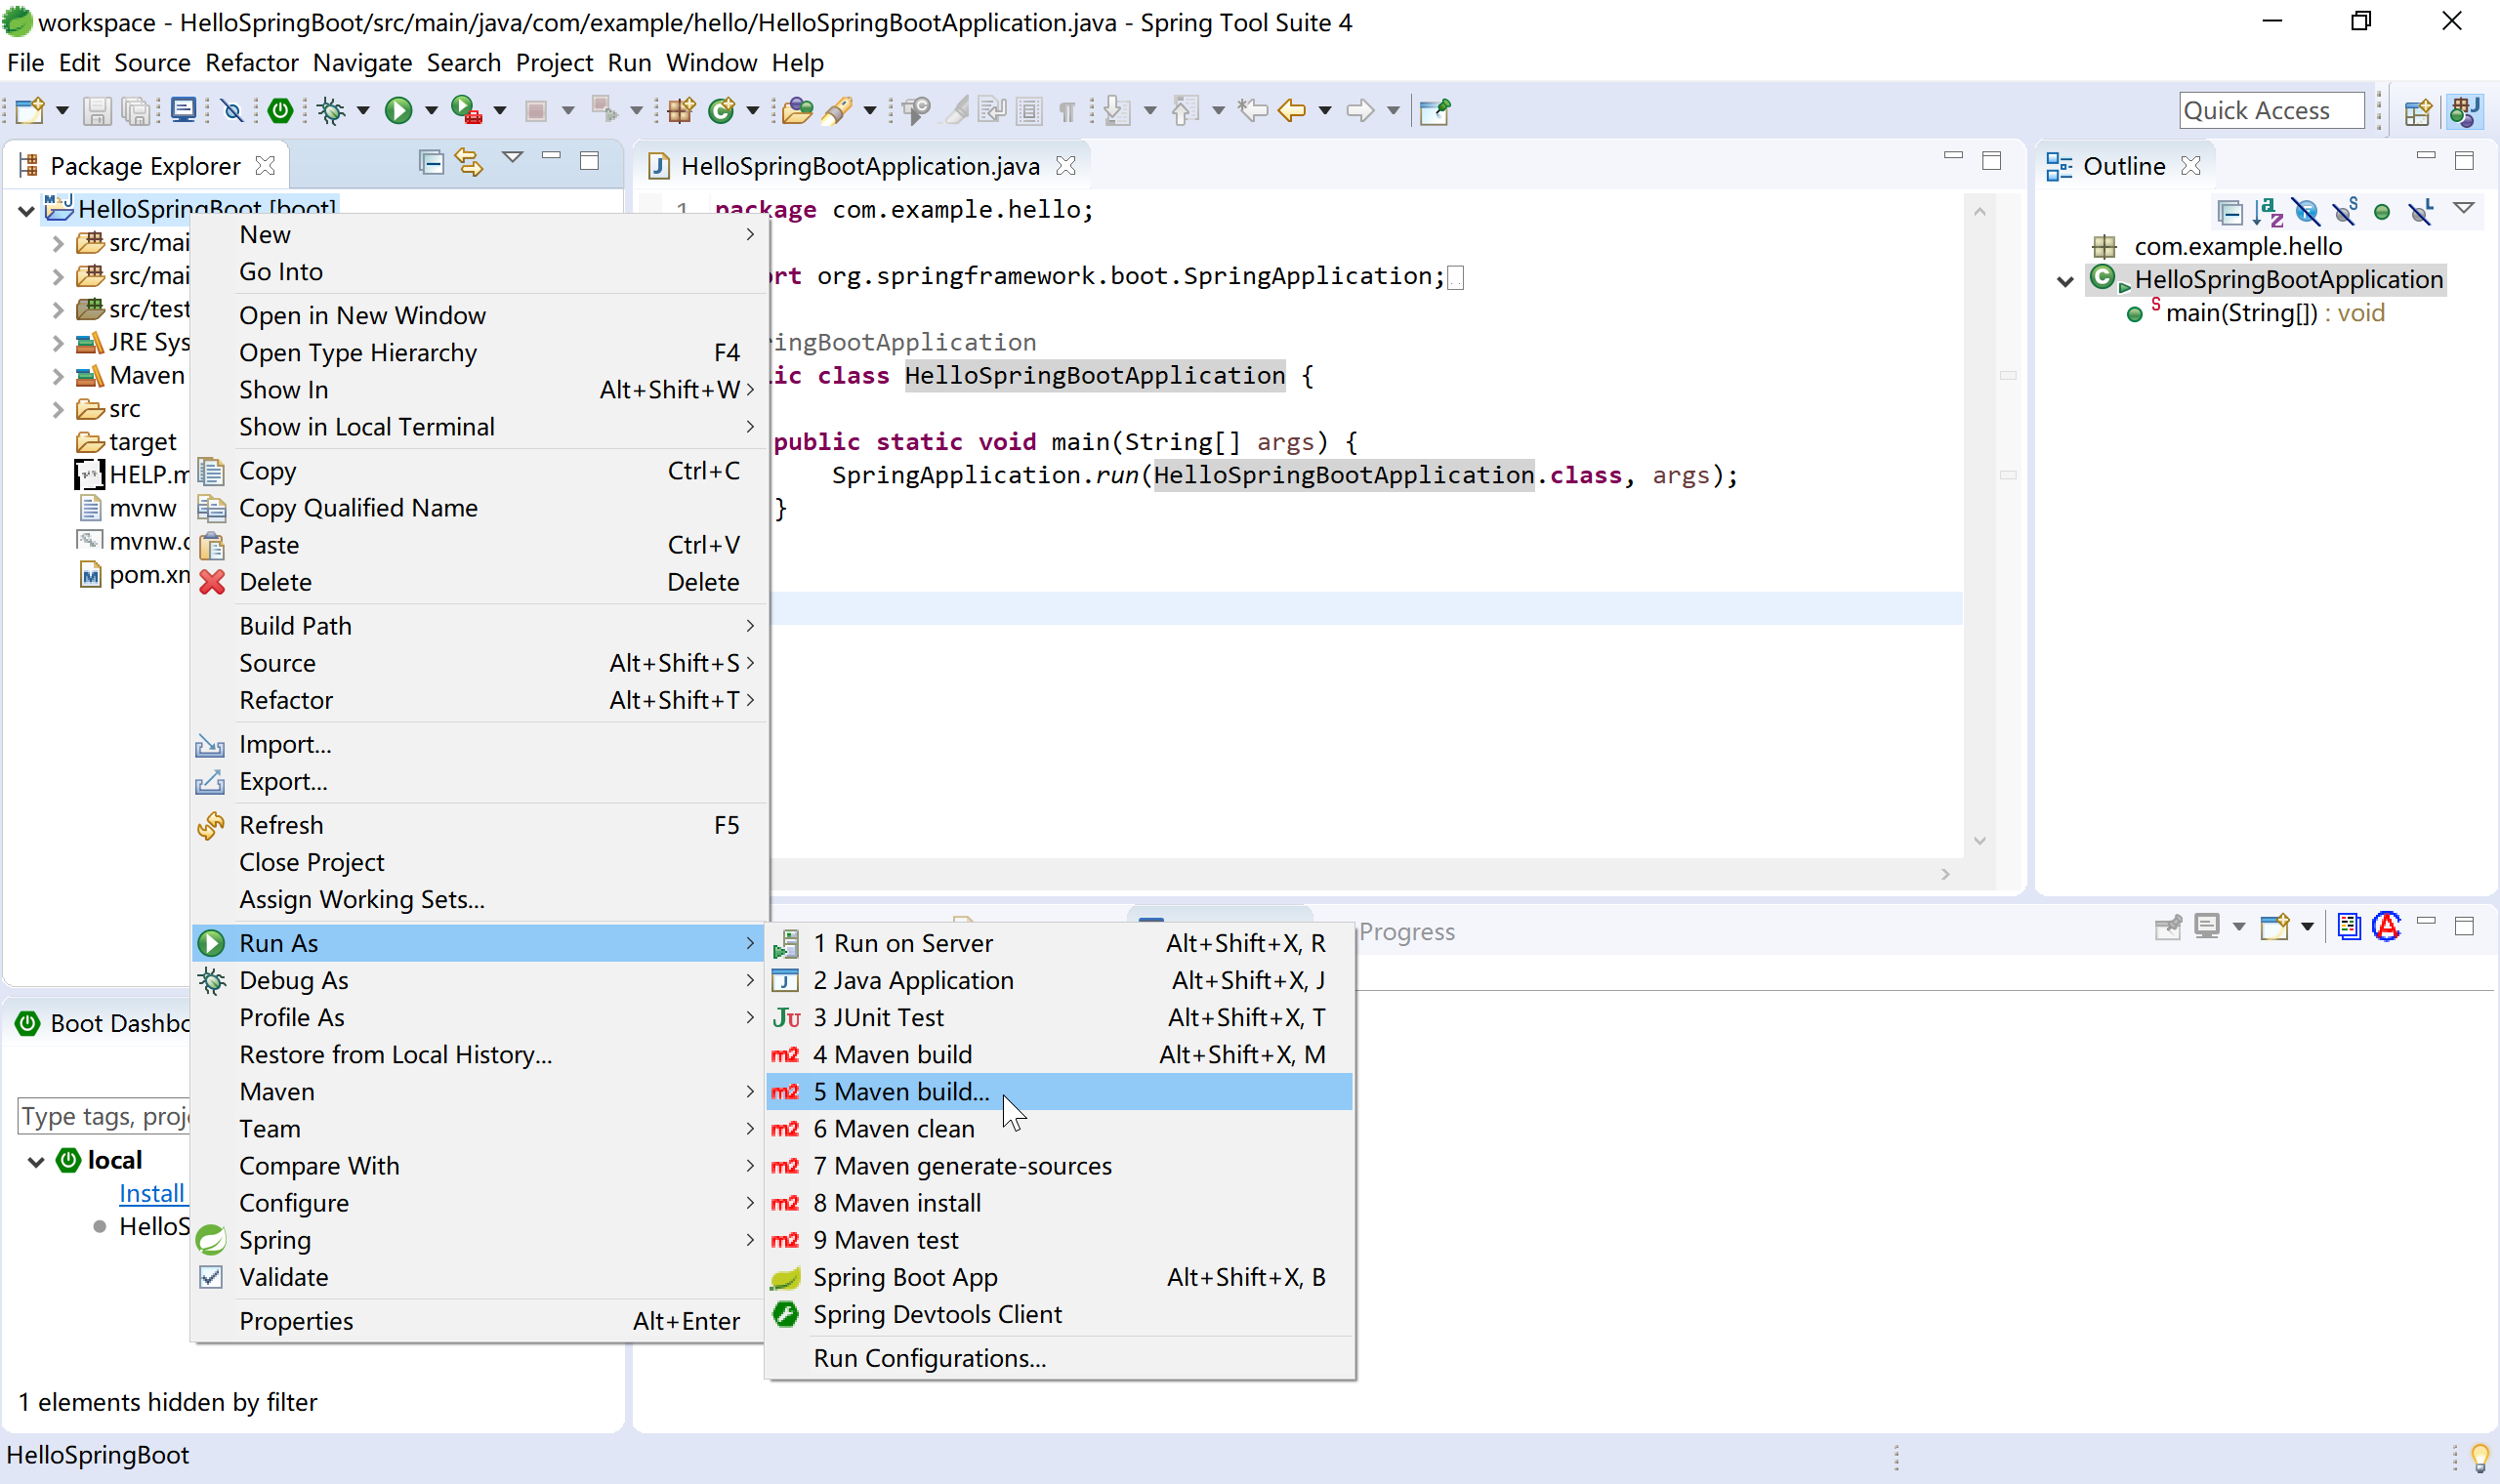
在Maven build的目标(Goals)中输入clean package,为了更快的打包,勾选Skip Tests复选框。
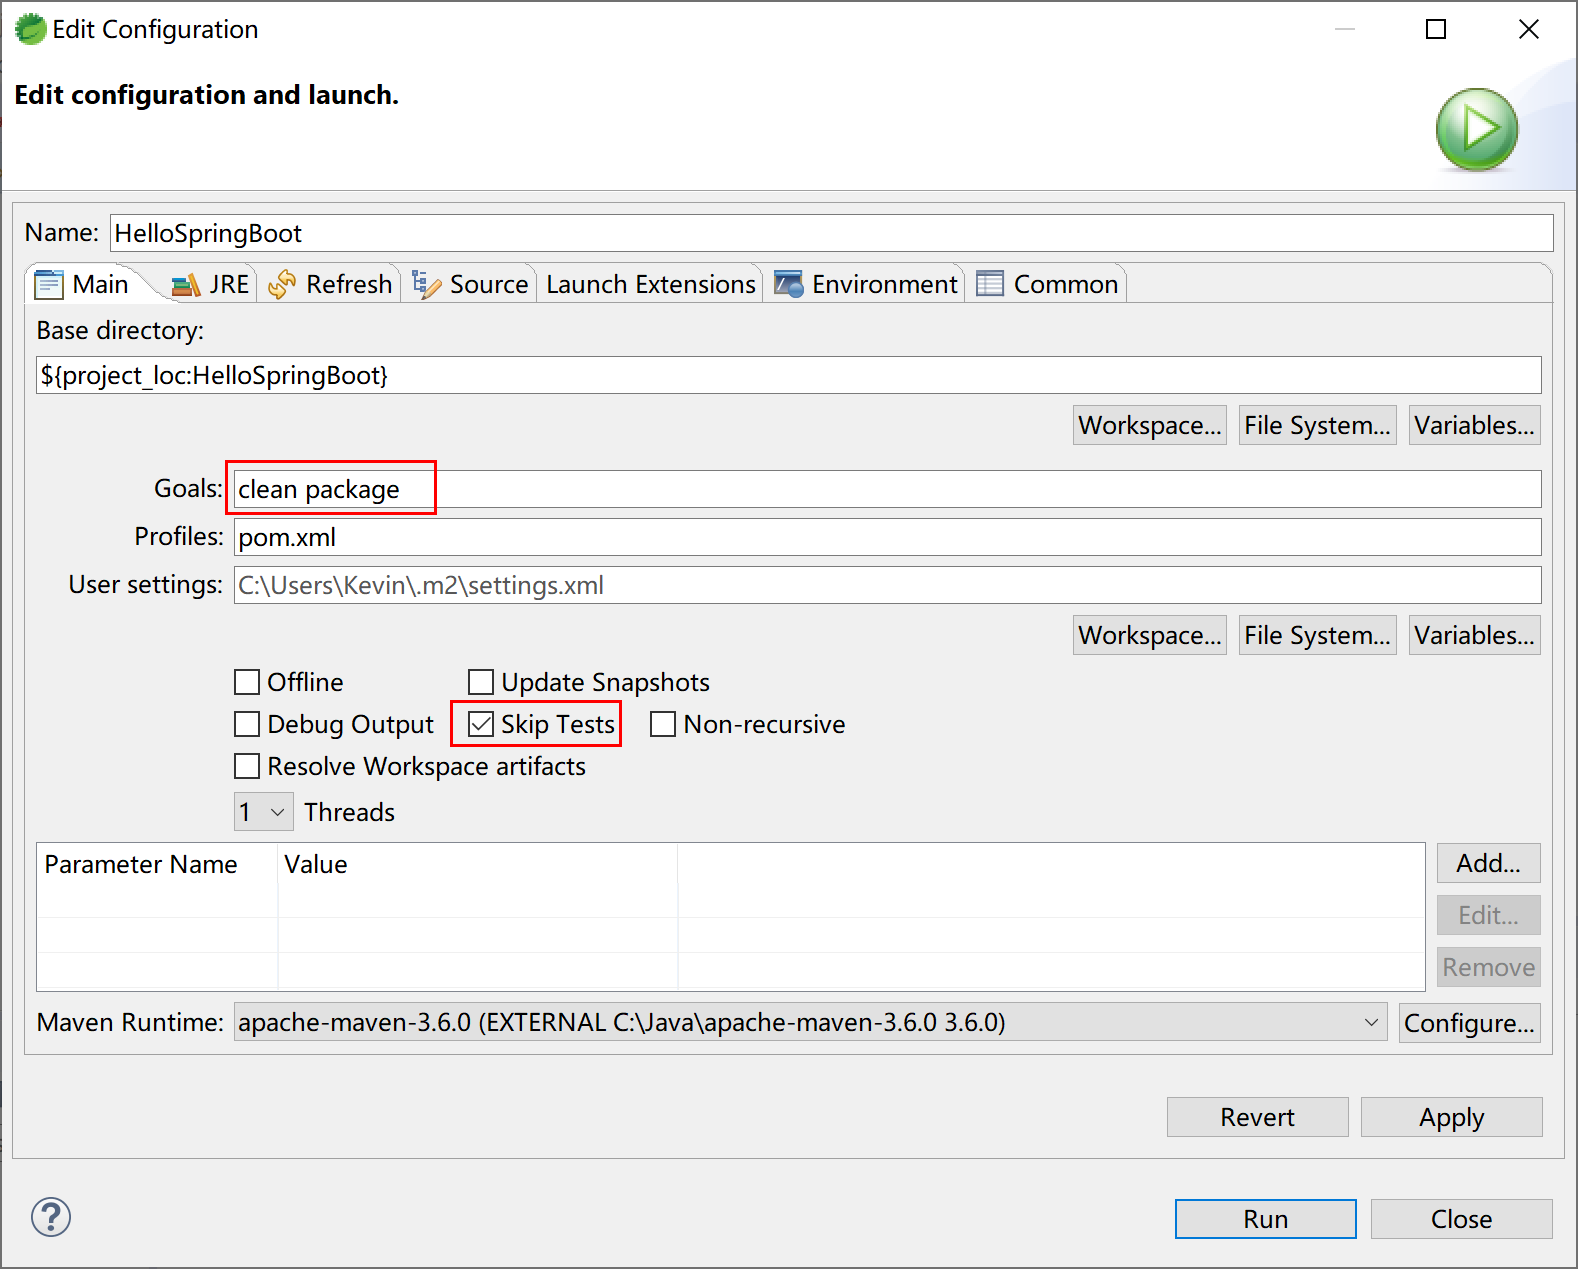
正常情况下,稍等片刻,Maven就会完成打包操作,注意观察控制台输出的日志。
[INFO] BUILD SUCCESS表示Maven任务正确完成。
[INFO] Scanning for projects...
[INFO]
[INFO] -------------------------< com.example:hello >--------------------------
[INFO] Building HelloSpringBoot 0.0.1-SNAPSHOT
[INFO] --------------------------------[ jar ]---------------------------------
[INFO]
[INFO] --- maven-clean-plugin:3.1.0:clean (default-clean) @ hello ---
[INFO] Deleting C:\sts-4.4.1.RELEASE\workspace\HelloSpringBoot\target
[INFO]
[INFO] --- maven-resources-plugin:3.1.0:resources (default-resources) @ hello ---
[INFO] Using 'UTF-8' encoding to copy filtered resources.
[INFO] Copying 1 resource
[INFO] Copying 0 resource
[INFO]
[INFO] --- maven-compiler-plugin:3.8.1:compile (default-compile) @ hello ---
[INFO] Changes detected - recompiling the module!
[INFO] Compiling 2 source files to C:\sts-4.4.1.RELEASE\workspace\HelloSpringBoot\target\classes
[INFO]
[INFO] --- maven-resources-plugin:3.1.0:testResources (default-testResources) @ hello ---
[INFO] Not copying test resources
[INFO]
[INFO] --- maven-compiler-plugin:3.8.1:testCompile (default-testCompile) @ hello ---
[INFO] Not compiling test sources
[INFO]
[INFO] --- maven-surefire-plugin:2.22.2:test (default-test) @ hello ---
[INFO] Tests are skipped.
[INFO]
[INFO] --- maven-jar-plugin:3.1.2:jar (default-jar) @ hello ---
[INFO] Building jar: C:\sts-4.4.1.RELEASE\workspace\HelloSpringBoot\target\hello-0.0.1-SNAPSHOT.jar
[INFO]
[INFO] --- spring-boot-maven-plugin:2.2.0.RELEASE:repackage (repackage) @ hello ---
[INFO] Replacing main artifact with repackaged archive
[INFO] ------------------------------------------------------------------------
[INFO] BUILD SUCCESS
[INFO] ------------------------------------------------------------------------
[INFO] Total time:  3.251 s
[INFO] Finished at: 2019-11-08T11:29:53+08:00
[INFO] ------------------------------------------------------------------------
[WARNING] The requested profile "pom.xml" could not be activated because it does not exist.
打开项目文件目录下的target子目录,其中hello-0.0.1-SNAPSHOT.jar就是打包好的项目可运行jar包。
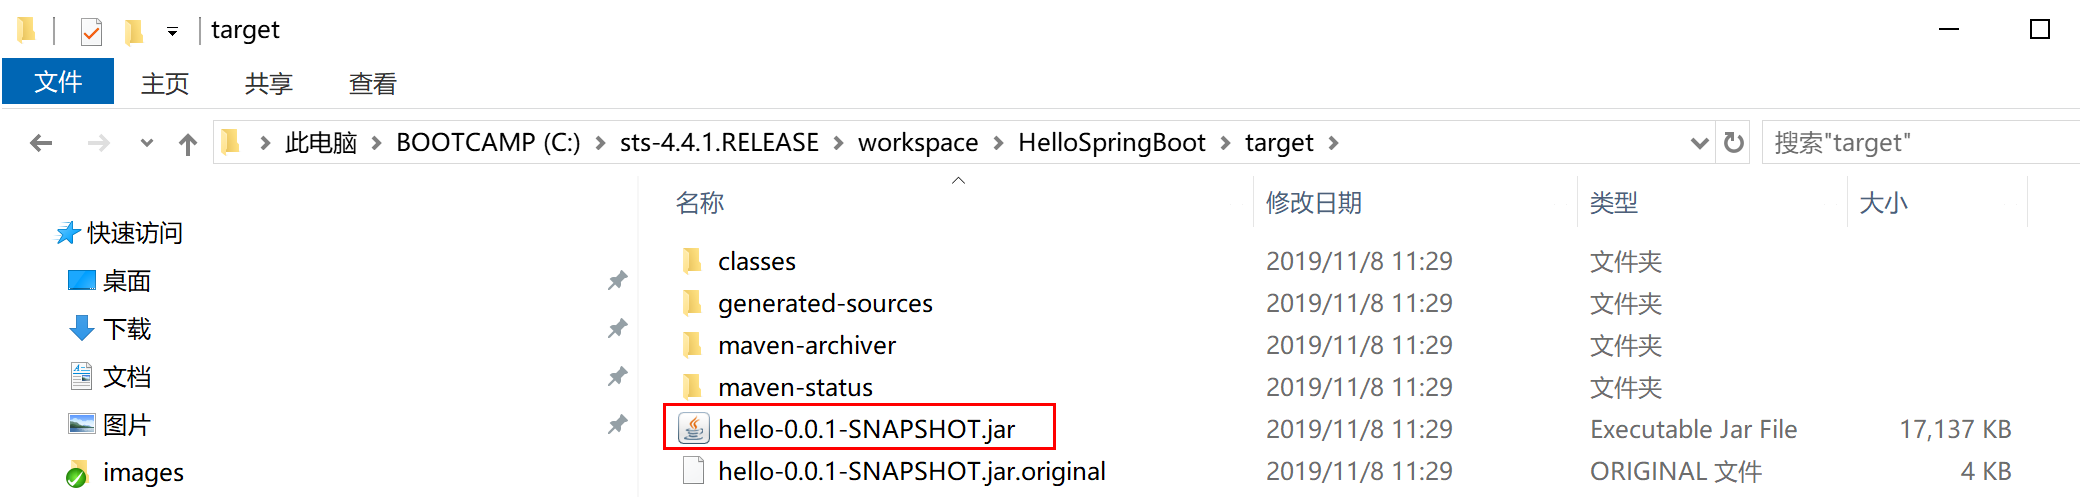
其中还有一个很小的
hello-0.0.1-SNAPSHOT.jar.original文件,就是项目编译的文件。而
hello-0.0.1-SNAPSHOT.jar是spring-boot-maven-plugin插件帮我们把依赖jar包和内嵌tomcat打包到一起了的fat jar。
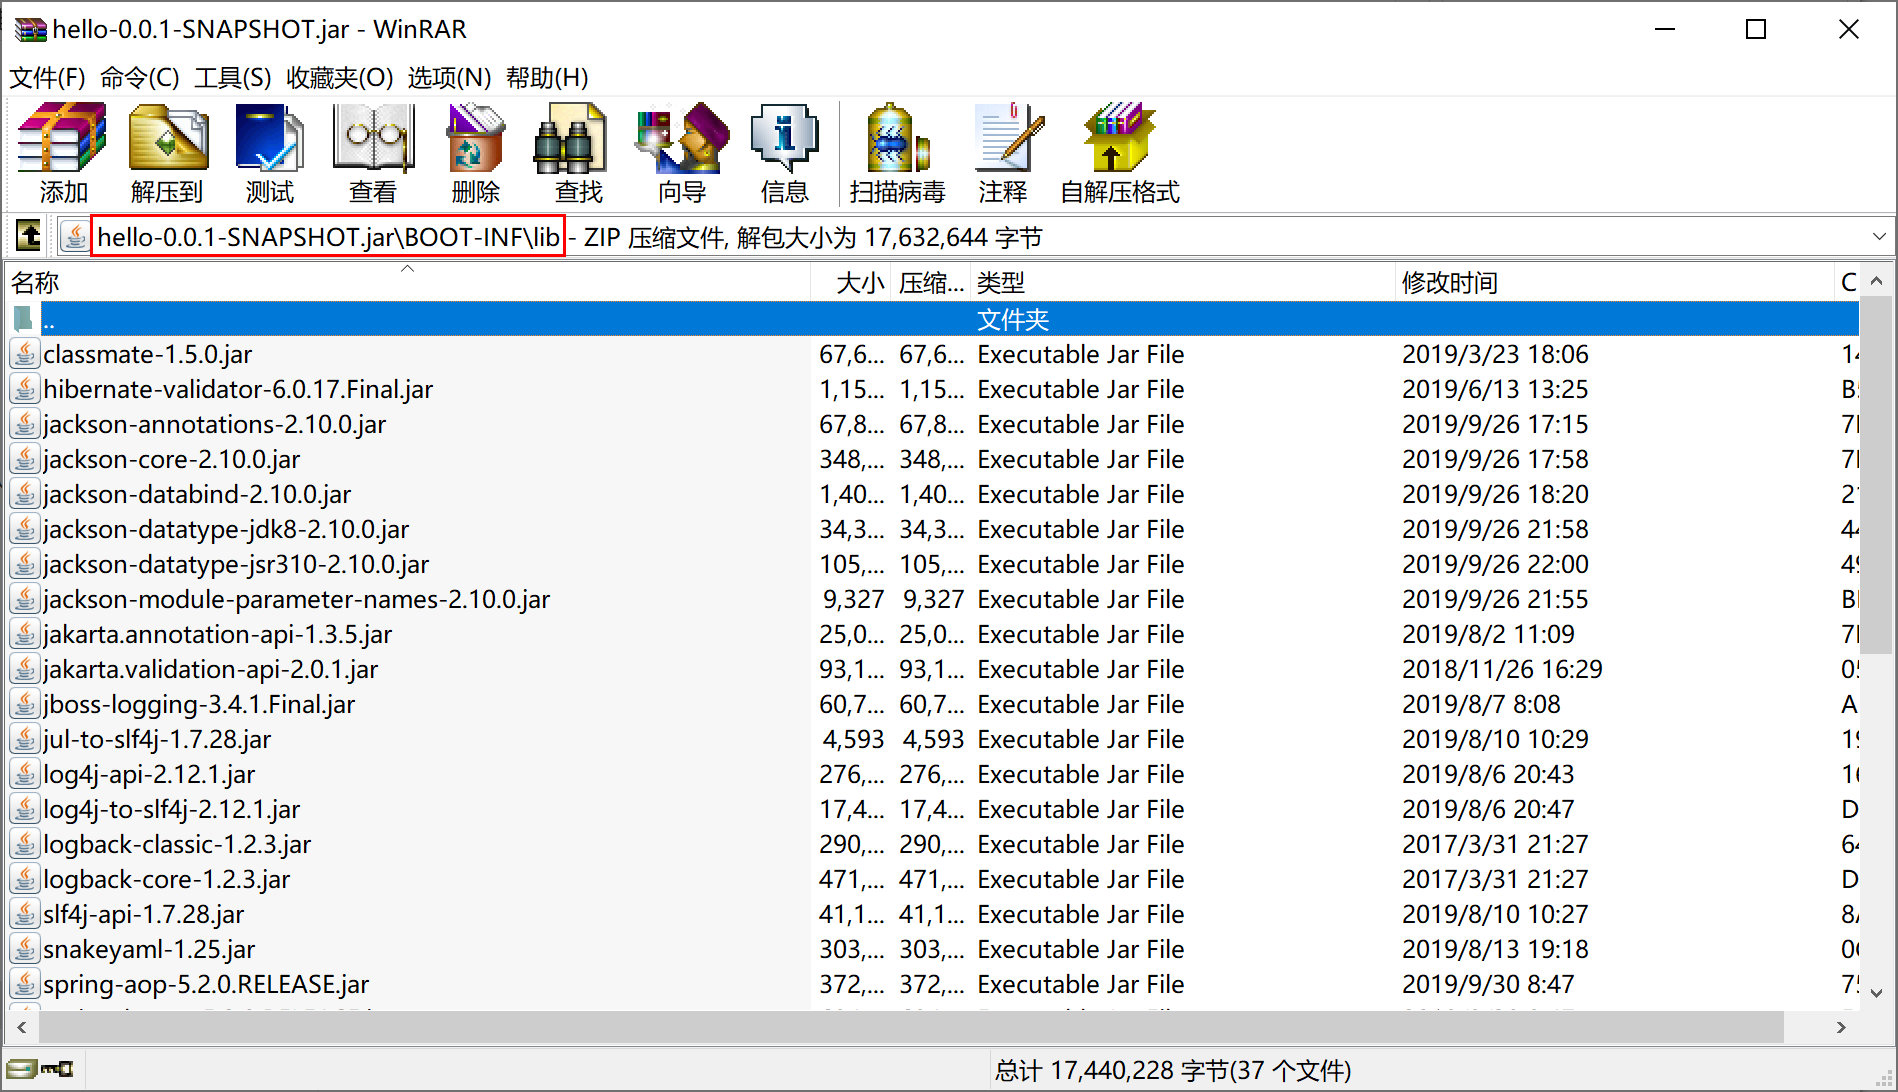
打开hello-0.0.1-SNAPSHOT.jar这个fat jar文件,查看其BOOT-INF\lib目录,可以看到其依赖的各种jar包。
1.4.5 独立运行程序
Spring Boot打包出来的jar文件支持独立运行,执行java -jar,运行Hello Spring Boot程序。
java -jar hello-0.0.1-SNAPSHOT.jar
在命令提示符窗口中,可以看到这个Spring Boot程序正确启动了。
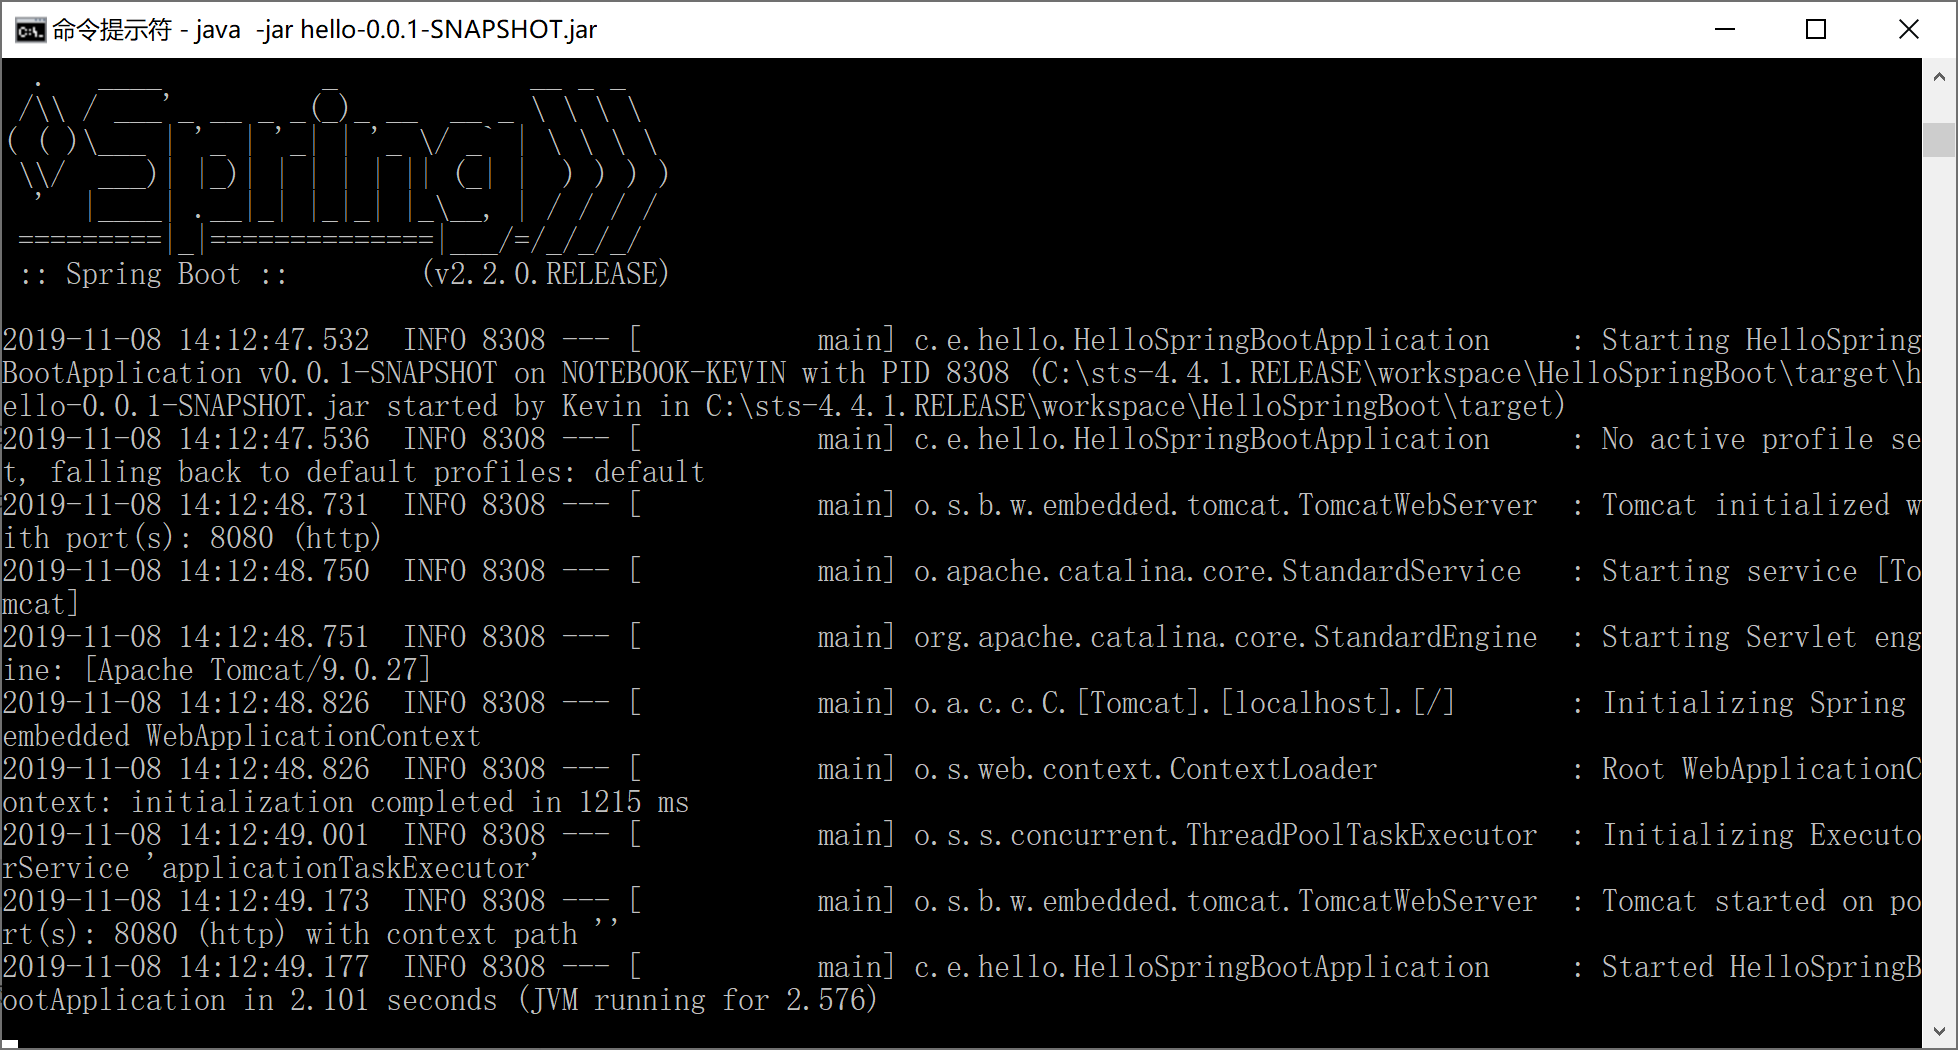
打开浏览器,访问localhost:8080/hello,同样可以正确得到前面Controller类中sayHello方法的输出。
如果当前端口(例如8080)被占用,需要在启动时指定服务器端口,可以通过--server.port=80来指定。
java -jar hello-0.0.1-SNAPSHOT.jar --server.port=80
更多Spring Boot的配置项,会在本教程的后续章节陆续介绍。
后续,我们会一步一步地介绍在实际工作中,如何使用Spring Boot集成我们常用的开发框架/类库。
本小节示例项目代码:
https://github.com/gyzhang/SpringBootCourseCode/tree/master/spring-boot-hello